How to Make Bargello Quilts Step by Step
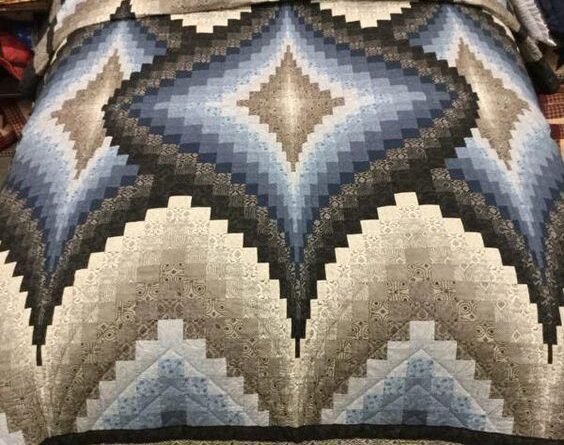
Bargello quilts are known for their flowing curves and dynamic patterns, creating a visually fascinating effect. Although the design may seem complex, it can be easily mastered by quilters of all skill levels.
If you love creating quilts and want to try something new, this guide is perfect for you. The best part? The pattern is completely free, meaning you can start at any time without any cost!
Based on the tutorial by Carol Thelen from Quilt Notes, you will see how simple it is to create a Bargello quilt in three basic steps. It doesn’t matter if you are a beginner or an experienced quilter; this project promises to be a creative and enjoyable journey.
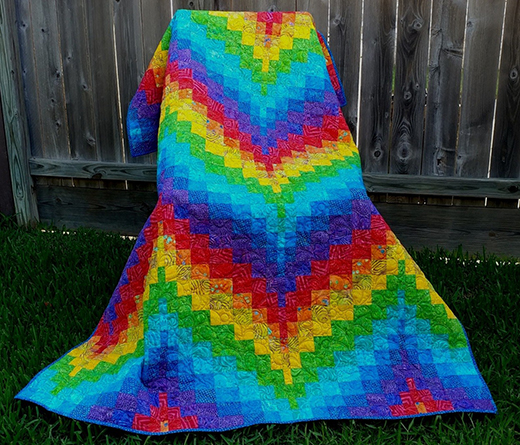
1. Choosing and Sewing the Horizontal Strips
The first step in creating a Bargello quilt involves sewing strips of fabric together horizontally. The key here is to select fabrics in different shades that, when sewn together, will create the wavy effect and movement.
Tips for Choosing Fabrics:
- Select 8 to 12 fabrics that have a progression of colors, moving from light to dark. This creates the necessary contrast to highlight the curves of the Bargello.
- Opt for high-quality fabrics to ensure durability and softness to the touch.
- For each strip, cut approximately 2.5 inches wide, but you can adjust according to the design you want.
Once cut, sew the horizontal strips together, using a 1/4-inch seam allowance. Press the seams with an iron to ensure they are aligned and flat. This step establishes a solid foundation for your project, so pay attention to detail to ensure each strip is sewn precisely.
2. Cutting and Organizing the Vertical Sets of Strips
After sewing the horizontal strips, the next step is to cut them into vertical strips. This is when the Bargello effect starts to take shape, creating the waves and movements that make this quilt so special.
Tips for Accurate Cutting:
- Use a quilting ruler and rotary cutter to cut the horizontal strip sets into varying widths, typically between 1 and 3 inches. The variation in widths is what creates the characteristic movement of the Bargello quilt.
- Keep the strips organized and in their original order to preserve the color flow you created.
The variation in cutting the strips is essential for creating the wavy design that distinguishes the Bargello style. The more accurate your cuts, the smoother and more fluid the final effect will be.
🧵🧶 ACCESS MORE FREE CRAFTS HERE ▶ ✂💻
3. Sewing the Vertical Sets Together
Now that the vertical strips have been cut, it’s time to sew them together to form the final pattern. This step requires attention, as the correct organization of the strips is crucial for ensuring that the wavy effect is well executed.
Tips for Assembly:
- Organize the strips so that the different widths and colors create a fluid and harmonious pattern.
- Sew the vertical strips together with a 1/4-inch seam allowance, using an iron to press and keep the seams flat throughout the process.
- Make sure all the strips are in the correct order before sewing them together, ensuring that the overall design is coherent.
This final step brings all the parts of your project together and reveals the beauty of the Bargello pattern. The result will be a fluid and elegant design that stands out for its curves and movement.
Finalizing Your Bargello Quilt
After completing the three main steps, you will see the characteristic wavy pattern of the Bargello quilt come to life. Depending on the size of the quilt you want, you can repeat the process to create more blocks and then join the blocks to form the complete top of the quilt.
Once the top is assembled, it’s time to quilt your piece. You can choose to quilt by hand or by machine, depending on your preference. Select a quilting pattern that complements the curves and movements of the Bargello, ensuring that the final result is harmonious and impactful.
Conclusion
Creating a Bargello quilt is a creative and rewarding experience, allowing you to transform simple fabrics into a complex and stunning design. The secret lies in the three essential steps: sewing the horizontal strips, cutting them into vertical strips, and finally sewing them together to create the wavy effect.
This pattern, inspired by the tutorial from Carol Thelen of Quilt Notes, is ideal for quilters looking to try something new and create a standout piece. The fact that it is a free pattern makes the project even more accessible for any quilter wanting to dive into the art of Bargello.
Now that you know the steps, it’s time to choose your fabrics, grab your sewing machine, and start creating. Bring your own Bargello project to life and craft a quilt that will surely be admired by everyone who sees it!
Click here for free How to Make Bargello Quilts Step by Step

